
How to Use Chord Groove
Chord Groove helps you create chord progressions, build strumming grooves, and practice them with smooth BPM-based playback.
The app is built around three main tabs: Chords, Grooves, and Play.
Getting Started
A simple way to get started is to generate a chord progression first, create a groove, and then combine them on the Play screen.
- Open the Chords tab.
- Choose a chord family, key, mode, and chord count.
- Tap Gen to create a progression.
- Tap Add to save the progression.
- Tap the saved progression name to select it for playback.
- Open the Grooves tab and create a strumming pattern.
- Save and select one or two grooves by tapping on the names.
- Open the Play tab, set the BPM, and press Play.
New to music theory? click here for an introductory guide to get the most out of Chord Groove.
Create a chord progression
This quick video shows how to choose a key, mode, then generate a progression.
Need guitar lessons?
Chord Groove is a practice tool for building progressions, grooves, and timing. If you want personal guidance with your playing, check out Ky Fisher Guitar Lessons for in-person lessons in Blacktown (Sydney Australia) and online guitar lessons.
Creating Chord Progressions
Choose your harmony
Use the Chords tab to choose the musical settings for your progression. You can select a chord family, root note, mode, chord count, and whether diminished chords are included.
Select Major, Minor, or Custom. Major and Minor generate chords randomly from the selected key and mode. Custom lets you build your own progression manually.
The mode determines the scale and chord types used in the generated progression. For example, C Major Ionian uses chords from the C major scale, while A Minor Aeolian uses chords from the A natural minor scale.
- Choose the progression settings you want to practice.
- Tap Gen to generate a new chord progression.
- Tap Add to save it.
- You can change the chords after generation and tap Upd to save your changes.
- Tap Info to view details about the progression, scale notes, and mode.
- Tap the saved progression name to select it for playback.
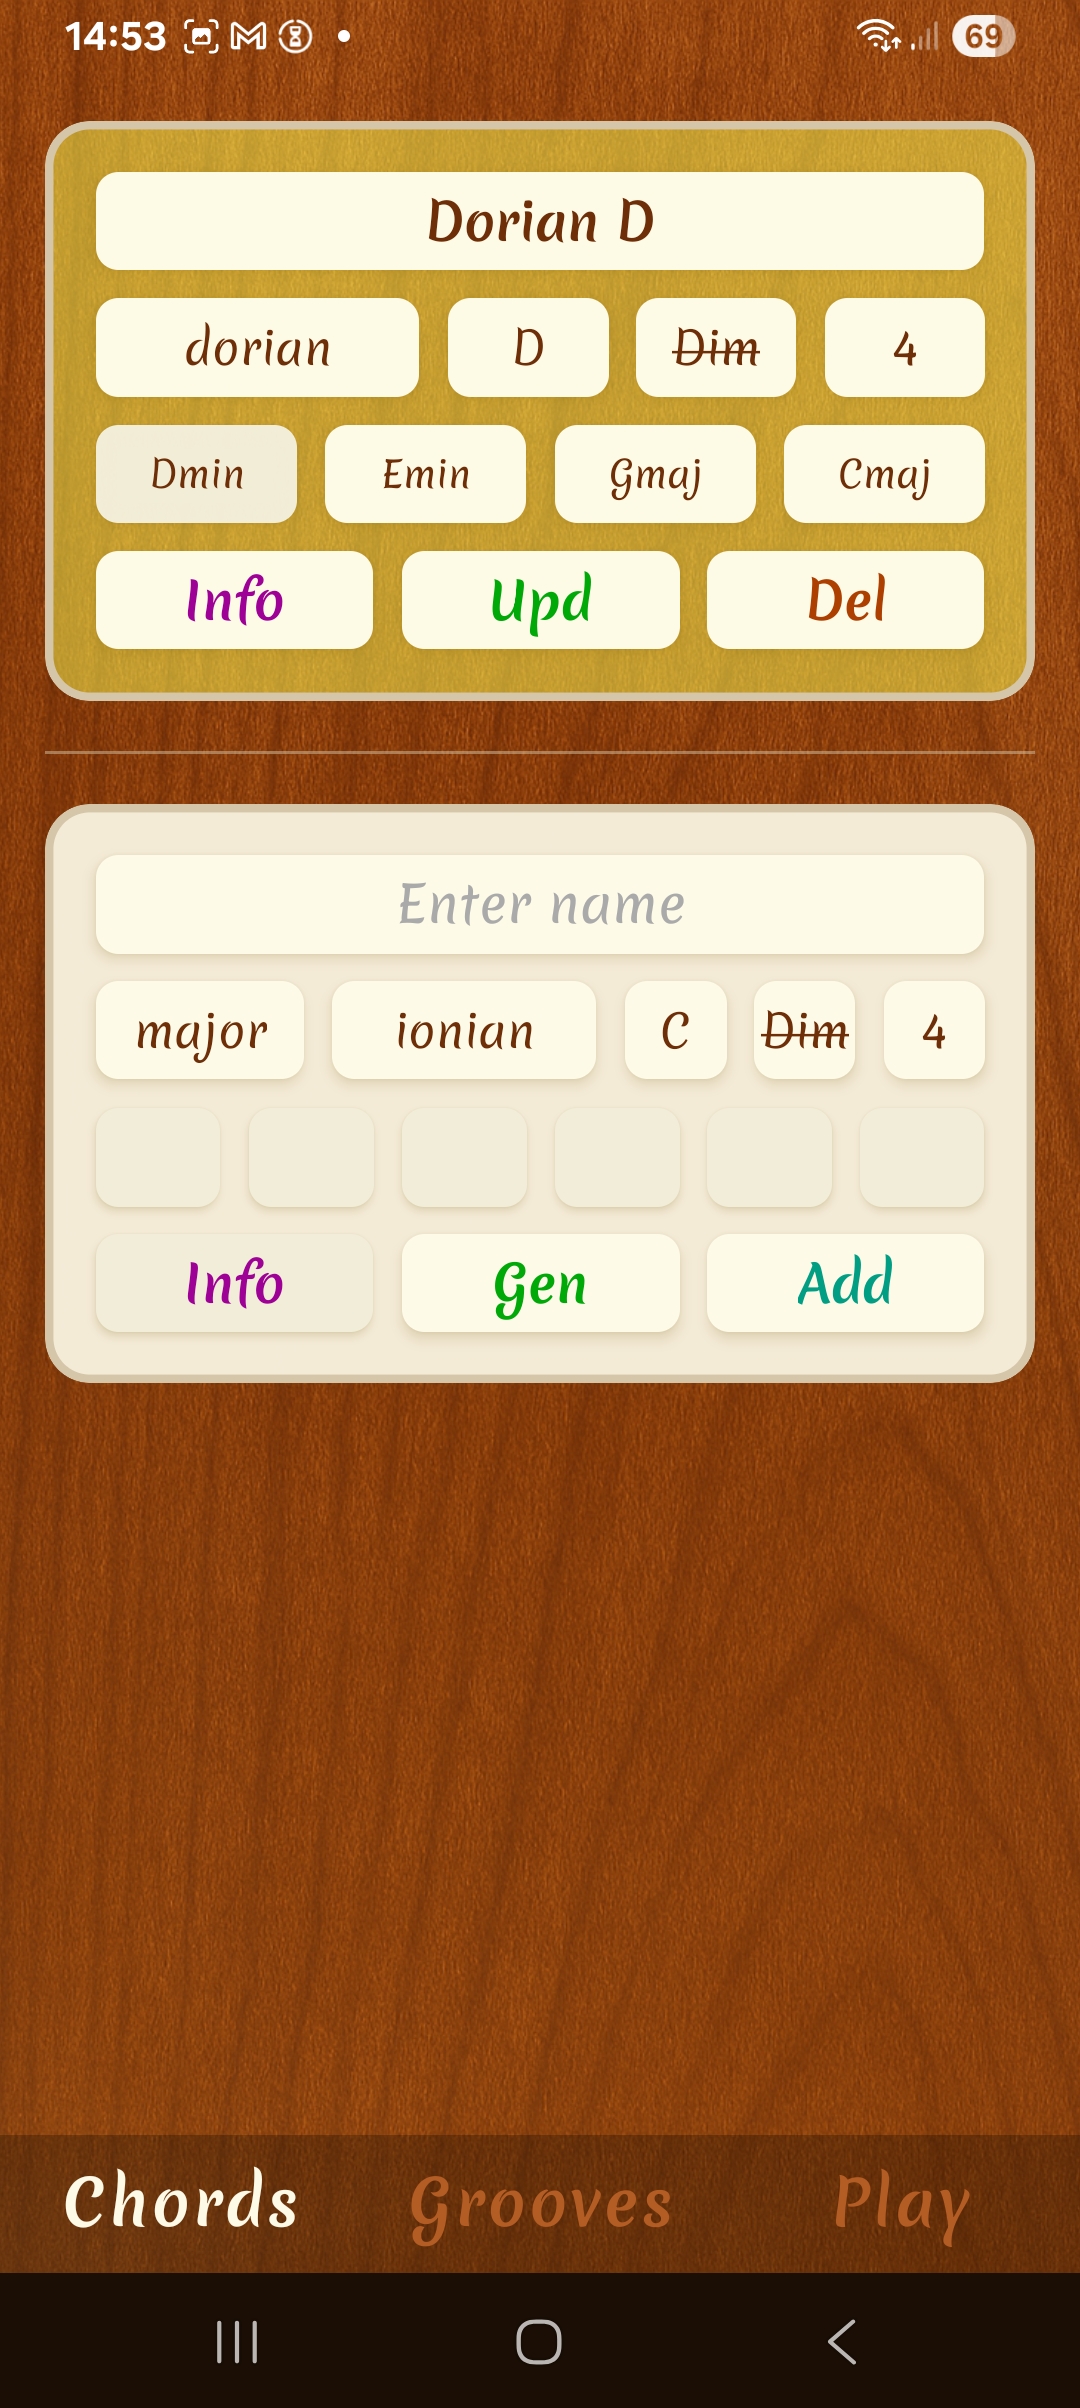
You can generate multiple progressions in the same key and mode until you find one that feels right. Save your favourites so they are available for selection.
Using Custom Chords
Build your own progression
If you already have a sound in mind, use Custom to manually choose the chords in your progression instead of generating them automatically.
- Select Custom from the chord family options.
- Choose a chord for each slot.
- Mix major, minor, or diminished chords.
- Create progressions that match your own song ideas.
When Custom is selected, key, mode, and diminished settings are not used because you are choosing the chords yourself.
Using Info Buttons
Learn what you are playing
The info buttons give extra musical context about your selected progression or playback setup. Use them when you want help understanding the mode, chord roles, relative scales, or the overall feel of the progression.
On the Chords screen, the info section explains the selected mode sound and lists the mode's signature chords. The selected chords are also shown with their roles relative to the mode. Many progressions include a bonus insight about the feel of the chord movement and how it relates to the selected mode.
On the Play screen, the info section can help you understand the selected progression, where the sound wants to resolve, and which relative scales may be useful when soloing over it.
Building Grooves
Create a strumming pattern
Use the Grooves tab to design your own strumming rhythm. Grooves are reusable, so you can save common patterns and try them across different chord progressions.
Each groove has 8 slots. Each slot can be a downstroke, upstroke, muted strum, or miss/rest.
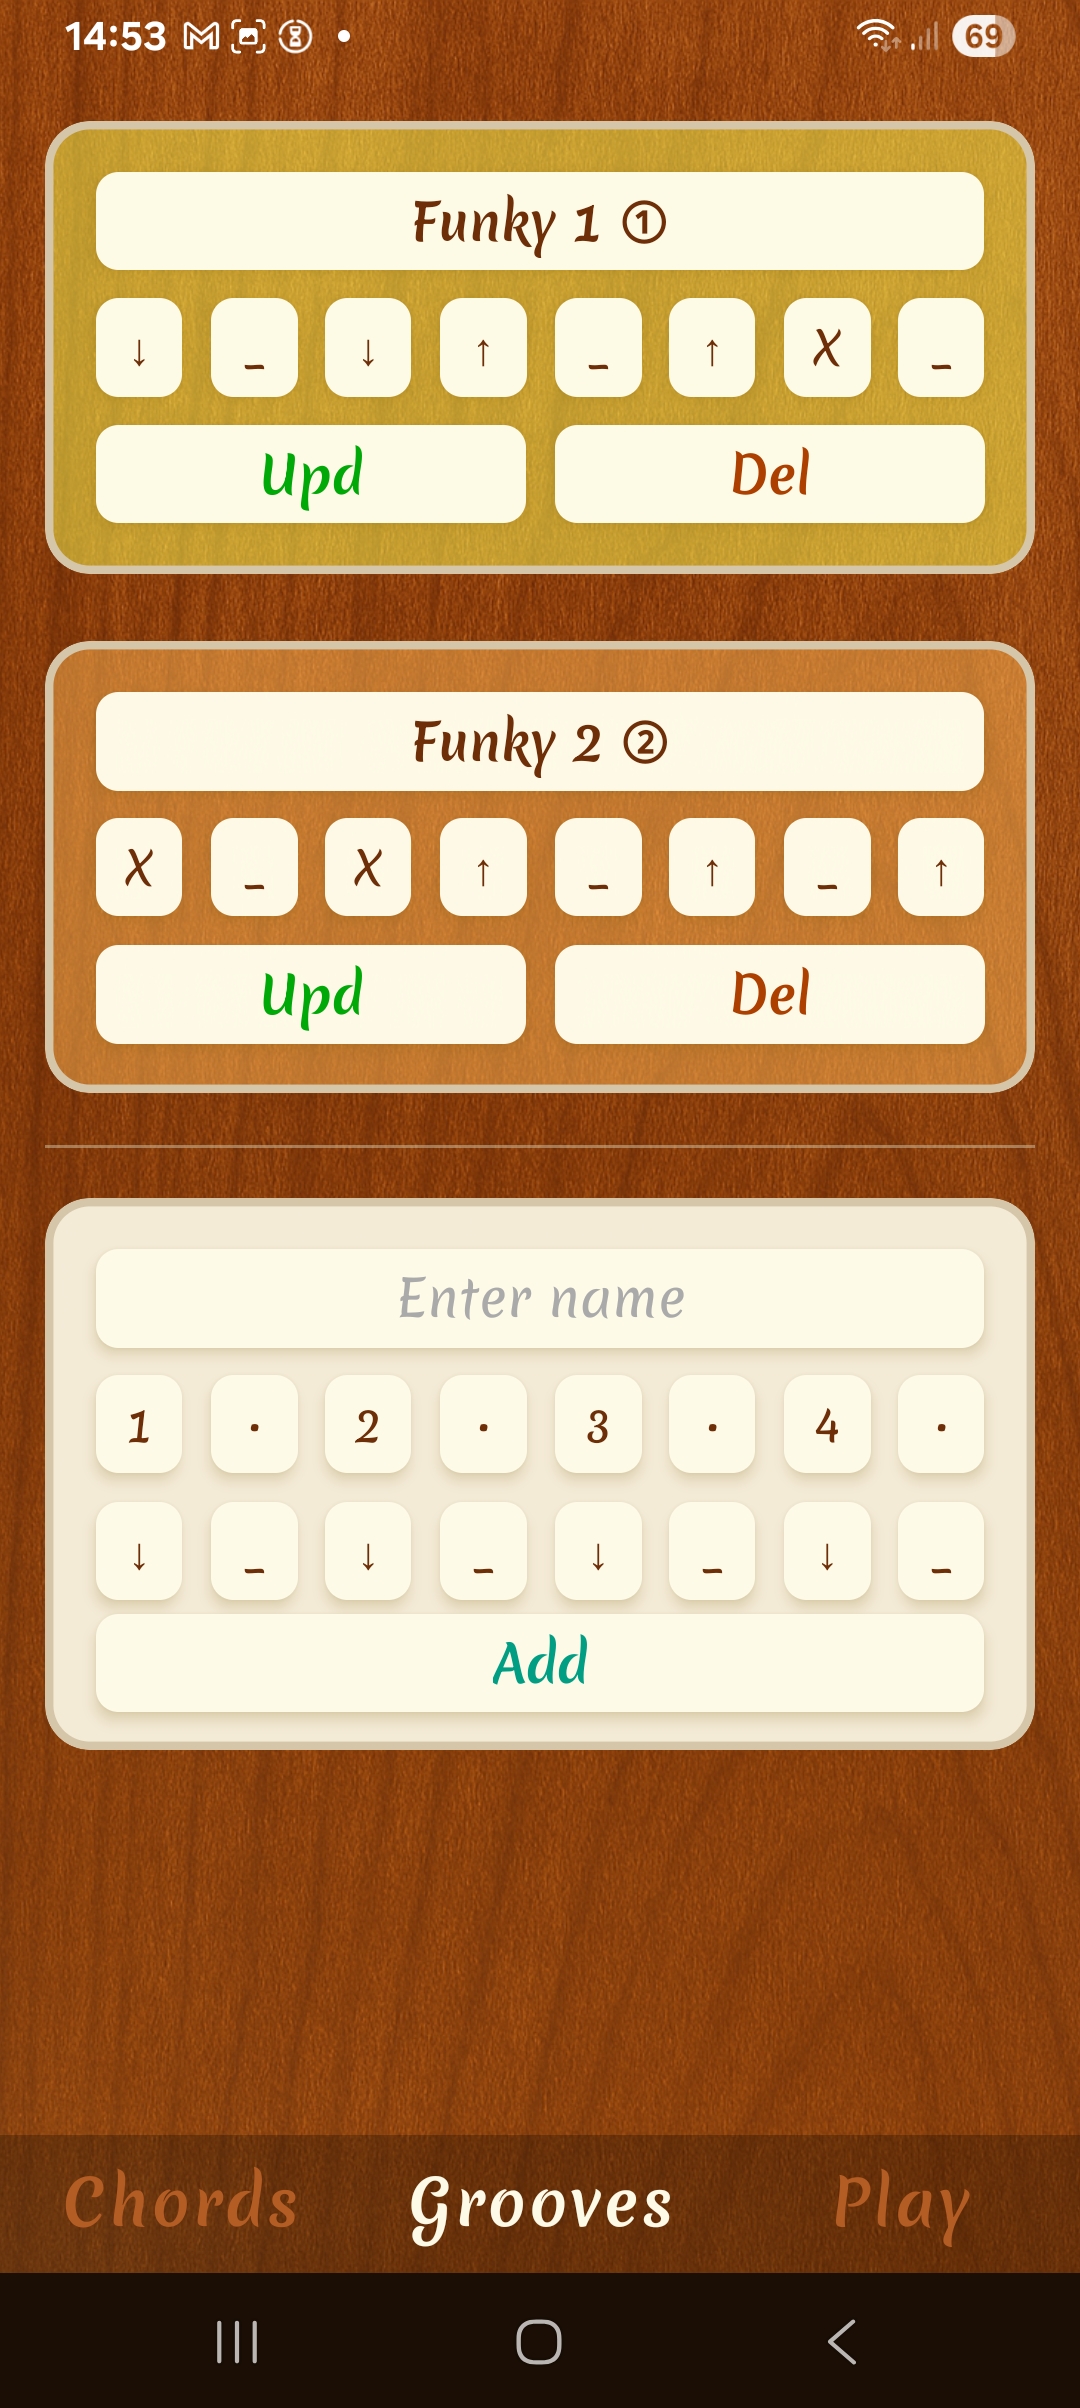
- Add downstrokes and upstrokes.
- Use muted strums to add rhythm without hearing the chords.
- Use misses/rests to create space.
- Update existing grooves or create new ones as you improve.
- Save your favourite grooves for later practice.
Playback & BPM
Use the Play screen to practice your selected chord progression with one or two saved grooves. Slide the BPM to match your practice tempo, then press Play to start.
- On the Chords screen, select a saved chord progression by tapping its name.
- On the Grooves screen, select one or two saved grooves.
- The Play screen will display the selected chords and grooves.
- Use Reset to return playback to the start.
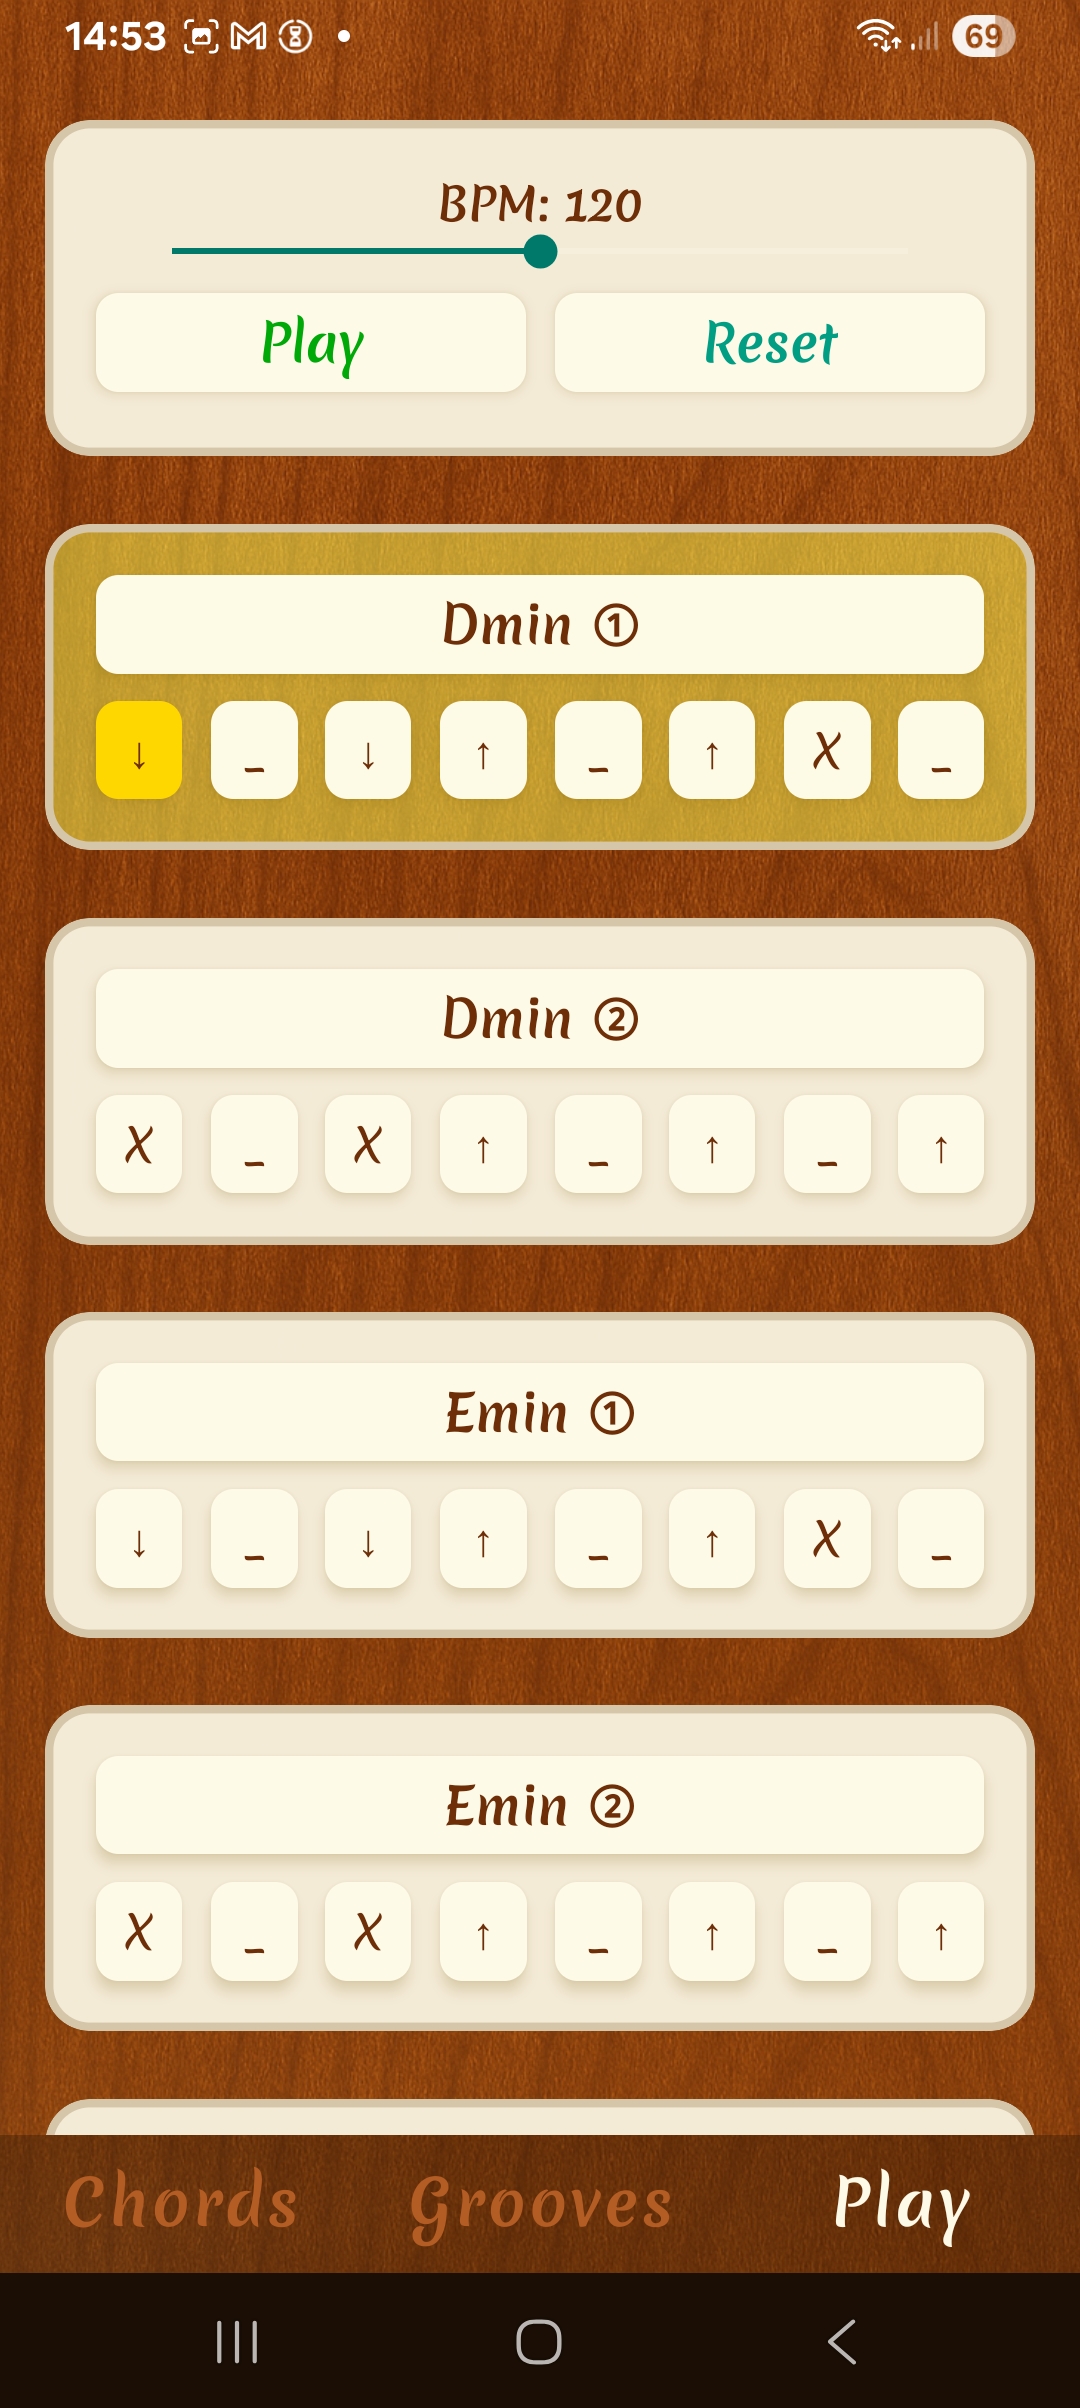
- Slow BPM is best for learning chord changes.
- Medium BPM is good for timing and rhythm practice.
- Fast BPM is useful once you are comfortable with the groove.
During playback, the active row is highlighted so you can follow the progression while you practice.
Using the 4-Count
The optional 4-count gives you a short muted count-in before playback starts. This can make it easier to begin playing in time with the groove.
The 4-count is enabled by default. To turn it off, tap the 4 button on the Play screen before pressing Play.
Quick Tips
- Use simple 3 or 4 chord progressions when learning.
- Save your favourite progressions so you can practice them again later.
- Try the same groove over different chord progressions.
- Try the same progression with different grooves to change the feel.
- Use slower BPM settings to improve timing and chord changes.
- Add a second groove when you want a fuller rhythm.
- Use the 4-count to give yourself time to start on the beat.
Practice Ideas
Chord Groove can be used for timing practice, songwriting, warm-ups, and exploring how different grooves change the feel of the same progression.
Try guitar-friendly keys
If you want simpler open-position chords, start with modes that use familiar guitar shapes.
- C Ionian for a bright major sound.
- A Aeolian for a natural minor sound.
- G Mixolydian for a major sound with a bluesy edge.
- E Phrygian for a darker minor sound.
- D Dorian for a minor sound with a smoother, brighter feel.
Use it for soloing practice
The Play screen info section can help you understand the selected progression, where the sound wants to resolve, and which relative scales can help when soloing over it.
- Choose a saved progression.
- Open the info section on the Play screen.
- Look at the mode, scale notes, and relative major or minor scale.
- Loop the progression at a slow BPM.
- Try creating simple melodies using the listed scale notes.
- Resolve your phrases back to the root note to hear the mode more clearly.
Explore different feels
Try keeping the same chord progression and changing only the groove. This helps you hear how rhythm can change the feel of the same harmony.
- Use a sparse groove for a relaxed feel.
- Use more upstrokes for extra movement.
- Add muted strums to make the rhythm more percussive.
- Layer two grooves when you want a fuller practice pattern.
Connect it with CAGED
Chord Groove also works well with CAGED practice. Once you have a progression looping, try finding the chord shapes in different areas of the neck and connect them with nearby scale notes.
- Choose a simple progression in C Ionian or A Aeolian.
- Loop the progression at a slow BPM.
- Find the chord shapes using familiar CAGED positions.
- Use the Play screen info to check the scale notes and relative scale.
- Try small melody ideas around each chord shape.
- Move between CAGED positions as the progression repeats.
Troubleshooting
Playback does not start
Make sure you have selected one saved chord progression and at least one saved groove.
Playback feels too fast
Lower the BPM and practice slowly before increasing the speed again.
It is hard to start in time
Turn on the 4-count from the Play screen. It gives you a short muted count-in before the first chord plays.
The groove does not feel right
Go back to the Grooves tab and check the strumming pattern. Try simplifying the groove first, then add more movement once it feels steady.
I cannot find my progression or groove
Make sure you saved it before leaving the Chords or Grooves tab. Saved items can then be selected by tapping their names.
Audio playback stalls or behaves strangely
Stop playback and try again. If the issue continues, close and reopen the app.